Parallel processing with Dask-MPI containers
Overview
Teaching: min
Exercises: minQuestions
Objectives
Learn the steps required to configure and run MPI applications from a container
Use conda environments inside a container
Note
To run exercises from this episode on your own, you’ll need a machine with Intel MPI libraries and Slurm scheduler installed. Using MPICH or other MPI distributions that are derived from MPICH and therefore “ABI-compatible” may also you work. If you only have Intel MPI/MPICH but not Slurm, you can achieve the same outcomes below by executing
./mpi_mpirun.shin substitution forsbatch mpi_ernz20.sh.
Conda environments inside a container
We will be using Dask-MPI in this lesson, an MPI-based variant of the popular Dask package for parallel processing in Python. Dask comes with a variety of parallelisation backends, such as multiprocessing or multithreading, but bundling it with MPI enables users to benefit from the extensive memory and IO resources of computer clusters and High-Performance Computers (HPCs).
Dask-MPI is most easily installed using the Conda package manager, which can automatically provide an MPI distribution, such as Intel MPI, and dependency packages such as mpi4py. Conda environments enable users to assemble a minimal set of packages that are needed for a given application, reducing complexity of the work environment and enhancing its robustness.
The following Singularity container definition will create a container with a “Miniconda” installation and generates a new environment “daskenv” that we will use to run the Dask-MPI example,
Bootstrap: docker
From: ubuntu:18.04

%post -c /bin/bash

    apt-get update && apt-get upgrade -y

    apt-get install -y wget
    wget https://repo.anaconda.com/miniconda/Miniconda3-latest-Linux-x86_64.sh
    bash Miniconda3-latest-Linux-x86_64.sh -b -p /opt/conda

    . /opt/conda/etc/profile.d/conda.sh
    conda create --name daskenv intel::mpi4py conda-forge::dask-mpi

%runscript
    exec /bin/bash -c ". /opt/conda/etc/profile.d/conda.sh; conda activate daskenv; python $@"
There are a few noteworthy features:
- Singularity needs to set up conda to create our environment during the
%postphase, which requires using thebashshell - we can ask Singularity to use bash using%post -c /bin/bash - We will also need to activate our environment every time the container runs - we can easily accomplish this by adding the required commands to the
%runscriptsection and use the container viasingularity run
The container can be easily built by pasting the above definition in dask-mpi.def and running
sudo singularity build dask-mpi_latest.sif dask-mpi.def
on a machine with root privileges, or using the remote builder service,
singularity build -r dask-mpi_latest.sif dask-mpi.def
if you have set up an account - don’t forget to log in first via singularity remote login, which requires providing a token that can be created on the website. When the build has finished, copy the container to $SIFPATH on the HPC.
If you cannot build the container yourself, you can download it using
singularity pull --dir $SIFPATH library://wolfganghayek/default/dask-mpi:latest
Once the image is available, try it out:
singularity run $SIFPATH/dask-mpi_latest.sif
This should launch a Python session similar to this:
Python 3.7.7 (default, May  7 2020, 21:25:33)
[GCC 7.3.0] :: Anaconda, Inc. on linux
Type "help", "copyright", "credits" or "license" for more information.
>>>
Exit from the session using Python’s exit() command.
Container behaviour is as requested - remember that we asked Singularity to load our daskenv environment and launch Python. We can pass command line arguments to Python as well:
singularity run $SIFPATH/dask-mpi_latest.sif --version
Python 3.7.7
Running Dask-MPI in a container
We are now all set to try out Dask-MPI in a container. Similar to the OpenFOAM-MPI lesson in this workshop, we will first run the example and look at the details later, in case you haven’t tried out MPI with containers before.
The following command will send job script mpi_ernz20.sh off to the Slurm scheduler and run the sample application:
cd $ERNZ20/demos/13_dask
sbatch mpi_ernz20.sh
The job should only take a few seconds. When it has finished, check the Slurm log file - it should contain output similar to
cat slurm*.out
distributed.http.proxy - INFO - To route to workers diagnostics web server please install jupyter-server-proxy: python -m pip install jupyter-server-proxy
distributed.scheduler - INFO - Clear task state
[... more Dask log output...]
Dask result: 5
Local result: 5
[... more Dask log output...]
The example used 3 MPI processes - this is the minimum for Dask-MPI, where the first MPI process with rank 0 becomes a scheduler, the second process with rank 1 runs the main Python script, and subsequent ranks become workers. You can request as many workers as you require to run your workload by increasing the number of processes, but don’t use less than 3, otherwise Dask-MPI will hang.
Analysing the batch script
Let’s have a look at the content of the script (mpi_ernz20.sh) we executed through the scheduler:
#!/bin/bash


#SBATCH --job-name=dask
#SBATCH --ntasks=3
#SBATCH --cpus-per-task=1
#SBATCH --mem-per-cpu=1G
#SBATCH --time=00:01:00

module load Singularity
module unload XALT

srun singularity run -B $PWD $SIFPATH/dask-mpi_latest.sif dask_example.py
So we simply prefixed our singularity command with Slurm’s srun MPI launcher. srun will automatically create the MPI runtime environment on each compute node on the HPC that will execute one or more of the requested ranks and launch the container there. As we discussed before, the singularity run command will activate our daskenv environment and execute python dask_example.py. Our example initialises MPI inside the container, and Singularity will allow it to connect to the MPI runtime environment on the compute node.
Note that other workload schedulers will use a different launcher than srun. If no scheduler is used, this will just be mpirun.
Requirements for the MPI + container combo
This setup implies the following requirements:
-
A host MPI installation must be present to spawn the MPI processes - the Mahuika and Māui Ancil clusters use Intel MPI
-
An MPI installation is required in the container that will be used by Dask-MPI - we obtained it by requesting the Intel MPI build of the
mpi4pypackage from the Conda package manager
Interconnect libraries and containers
If the HPC system you’re using has high speed interconnect infrastructure, then it will also have some system libraries to handle that at the application level. These libraries may need to be exposed to the containers, too, similar to the MPI libraries, if maximum performance is to be achieved.
This can be a challenging task for a user, as it requires knowing details on the installed software stack. System administrators should be able to assist in this regard.
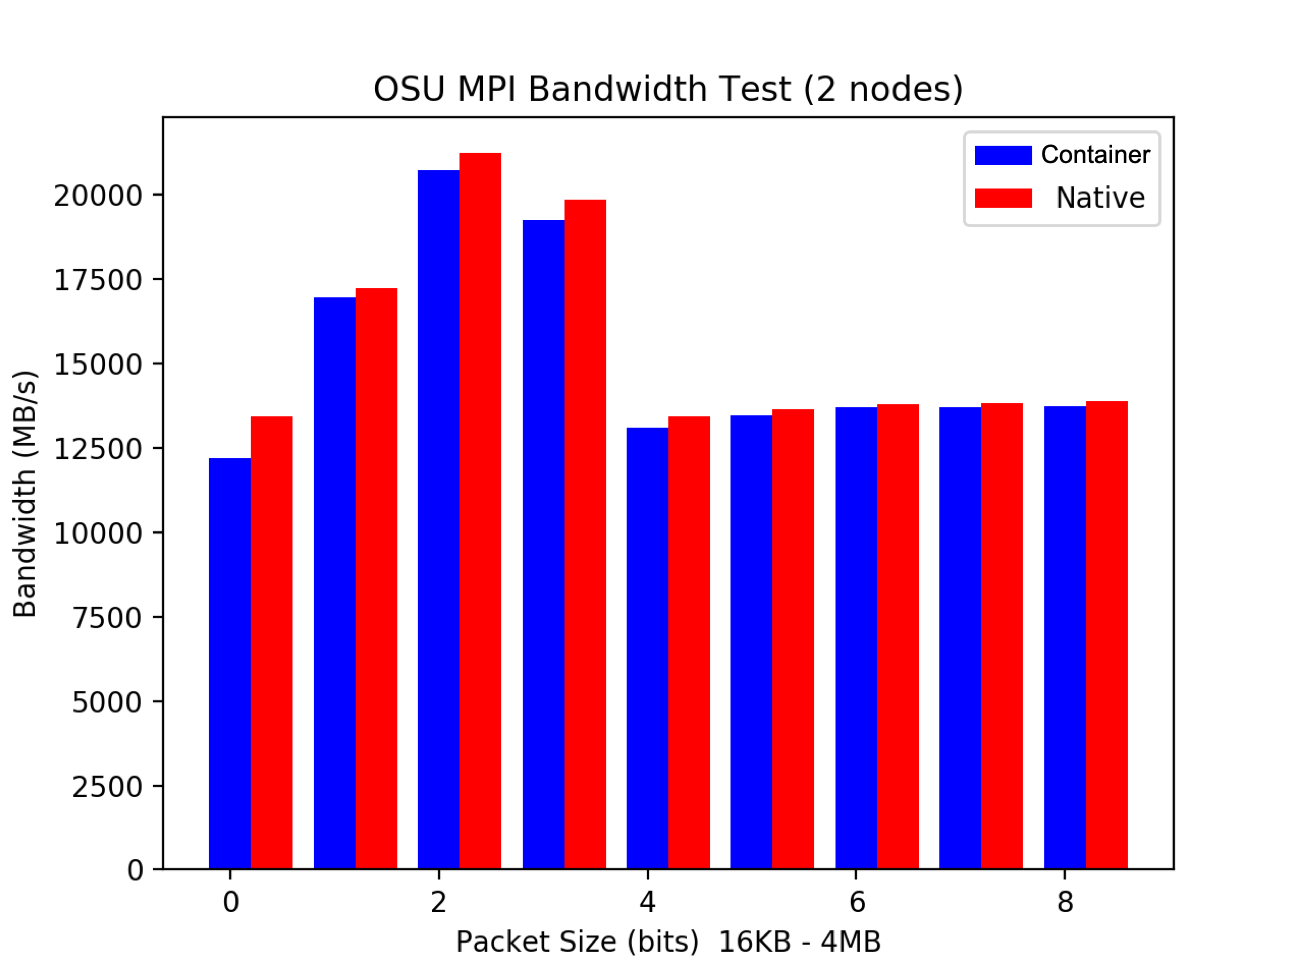
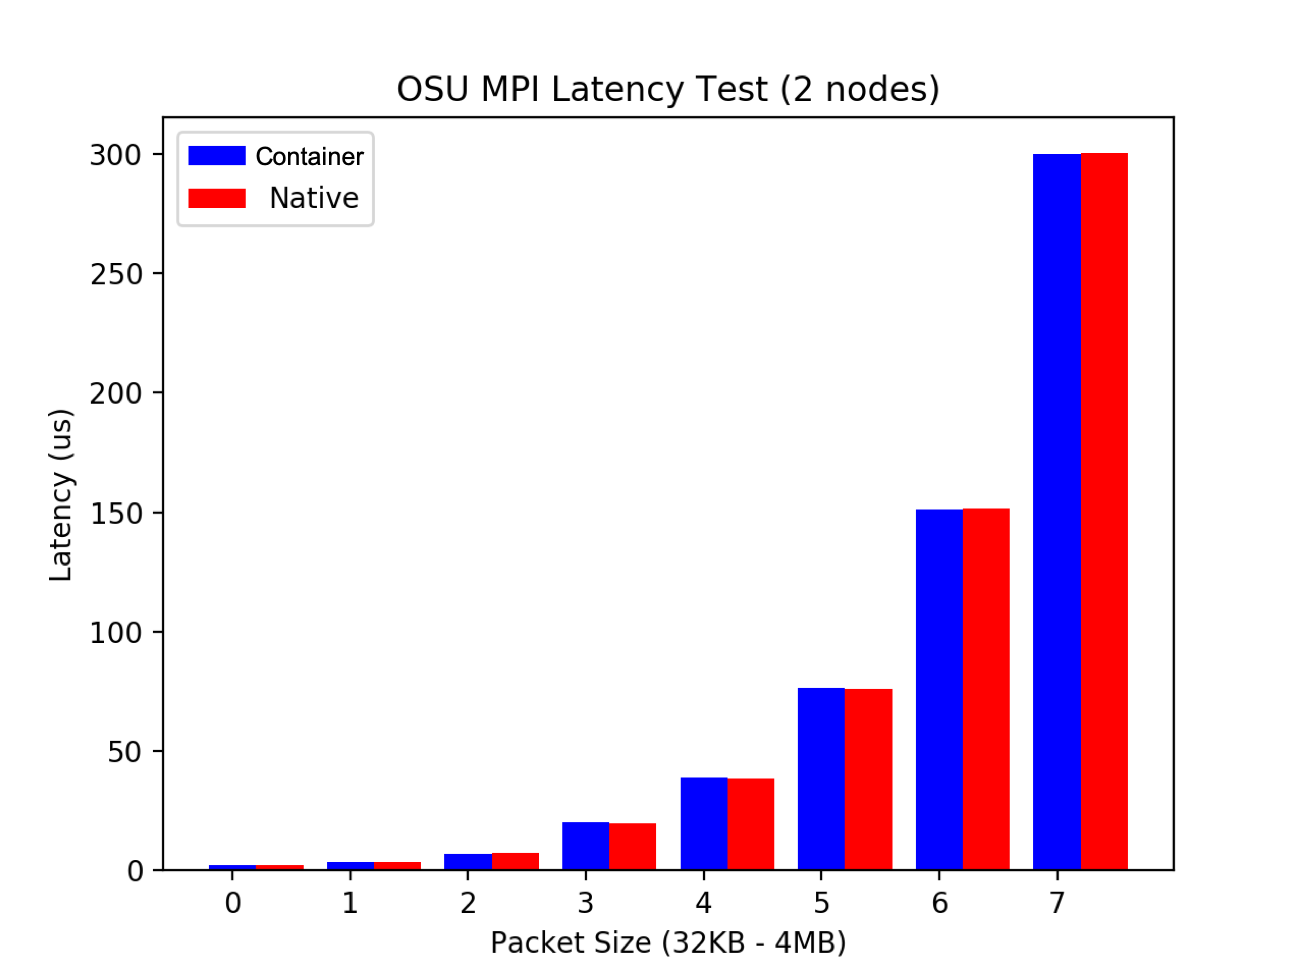
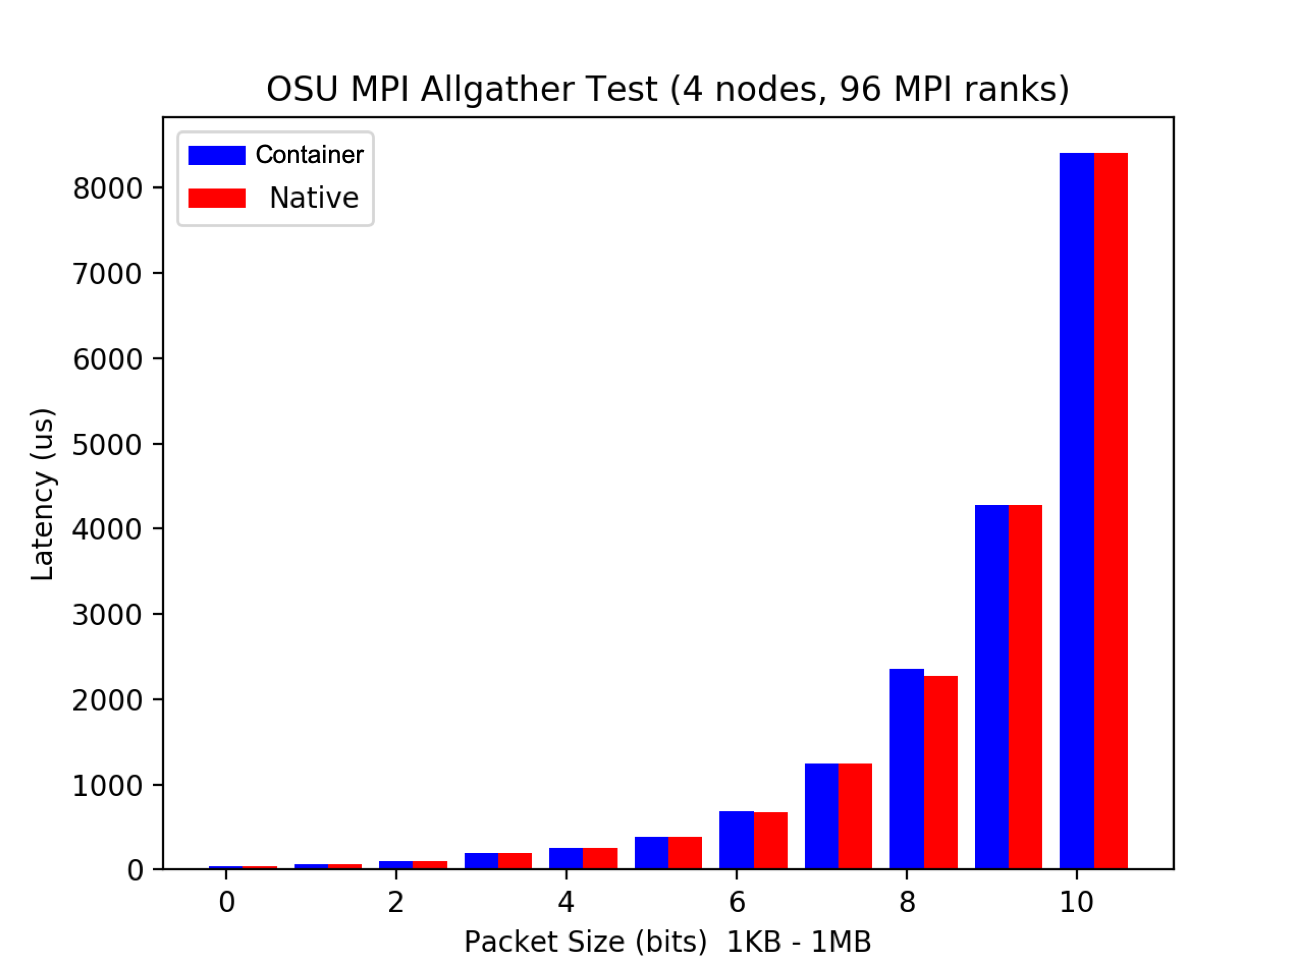
MPI performance: container vs bare metal
What’s the performance overhead in running an MPI application through containers?
Well, the benchmark figures just below reveal it’s quite small..good news!


Running this example with mpirun without Slurm
If you want to run this example without schedulers, you might want to execute the provided script
mpi_mpirun.sh.
Key Points
Singularity interfaces with HPC schedulers such as Slurm, with some requirements
You need to build your application in the container with an MPI version which is ABI compatible with MPI libraries in the host
Appropriate environment variables and bind mounts may be required at runtime to make the most out of MPI applications (sys admins can help)