Getting Started with Containers
Overview
Teaching: 20 min
Exercises: 0 minQuestions
What is a container and why might I want to use it?
Objectives
Understand what a container is and when you might want to use it.
The episodes in this lesson will introduce you to the Apptainer container platform and demonstrate how to set up and use Apptainer.
What are Containers
A container is an entity providing an isolated software environment (or filesystem) for an application and its dependencies.
If you have already used a Virtual Machine, or VM, you’re actually already familiar with some of the concepts of a container.
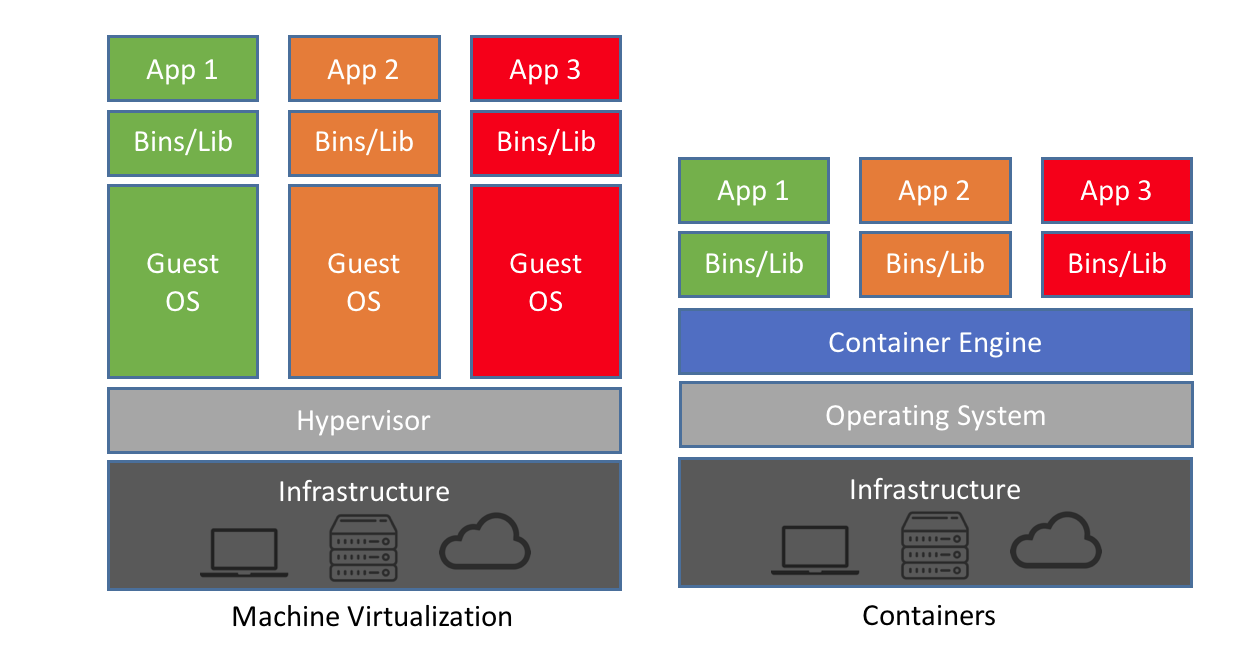
The key difference here is that VMs virtualise hardware while containers virtualise operating systems. There are other differences (and benefits), in particular containers are:
- lighter weight to run (less CPU and memory usage, faster start-up times)
- smaller in size (thus easier to transfer and share)
- modular (possible to combine multiple containers that work together)
Since containers do not virtualise the hardware, containers must be built using the same architecture as the machine they are going to be deployed on. Containers built for one architecture cannot run on the other.
Containers and your workflow
There are a number of reasons for using containers in your daily work:
- Data reproducibility/provenance
- Cross-system portability
- Simplified collaboration
- Simplified software dependencies and management
- Consistent testing environment
Terminology
We’ll start with a brief note on the terminology used in this section of the course. We refer to both images and containers. What is the distinction between these two terms?
Images are bundles of files including an operating system, software and potentially data and other application-related files. They may sometimes be referred to as a disk image or container image and they may be stored in different ways, perhaps as a single file, or as a group of files. Either way, we refer to this file, or collection of files, as an image.
A container is a virtual environment that is based on an image. That is, the files, applications, tools, etc that are available within a running container are determined by the image that the container is started from. It may be possible to start multiple container instances from an image. You could, perhaps, consider an image to be a form of template from which running container instances can be started.
A registry is a server application where images are stored and can be accessed by users. It can be public (e.g. Docker Hub) or private.
To build an image we need a recipe. A recipe file is called a Definition File, or def file, in the Apptainer jargon and a Dockerfile in the Docker world.
Container engines
A number of tools are available to create, deploy and run containerised applications. Some of these will be covered throughout this tutorial:
Docker
![]()
The first engine to gain popularity, still widely used in the IT industry. Not very suitable for HPC as it requires root privileges to run.
See the documentation for more information.
Singularity
![]()
A simple, powerful root-less container engine for the HPC world. Originally developed at the Lawrence Berkeley National Laboratory.
See the documentation for more information.
Apptainer
![]()
An open-source fork of Singularity. Extends the functionality of Singularity and moving forward will likely become the open-source standard.
See the documentation for more information.
That concludes this container overview. The next episode looks in more detail at setting up your environment for running containers on the NeSI cluster.
Key Points
Containers enable you to package up an application and its dependencies.
By using containers, you can better enforce reproducibility, portability and share-ability of your computational workflows.
Apptainer (and Singularity) are container platforms and are often used in cluster/HPC/research environments.
Apptainer has a different security model to other container platforms, one of the key reasons that it is well suited to HPC and cluster environments.
Apptainer has its own container image format based off the original Singularity Image Format (SIF).
The
apptainercommand can be used to pull images from Docker Hub or other locations such as a website and run a container from an image file.
The Container Cache
Overview
Teaching: 20 min
Exercises: 0 minQuestions
Why does Apptainer use a local cache?
Where does Apptainer store images?
How do I configure my cache to work on NeSI?
Objectives
Learn about Apptainer’s image cache.
Learn howto setup your cache on Mahuika
Apptainer’s image cache and temporary files
Apptainer doesn’t have a local image repository in the same way as Docker, however, it does cache downloaded image files. Apptainer also uses a temporary directory for building images.
By default, Apptainer uses $HOME/.Apptainer as the location for cache and temporary files. However, on NeSI, our home directories are quite small, so we need to move these to a more appropriate location such as our nobackup storage.
You can change the location of the cache by setting environment variables to the cache and temporary directory locations you want to use. Those environment variables are:
APPTAINER_CACHEDIR & APPTAINER_TMPDIR
We will now setup our Apptainer environment for use on NeSI.
Create a cache and temporary directory for use on NeSI
Due to our backend high-performance filesystem, special handling of your cache and temporary directories for building and storing container images is required. What we will do in the following exercise is create a temporary and cache directory, reconfigure the permissions on those directories and then declare special environment variables that will tell Apptainer where it should store files and images.
[username@mahuika01]$ export APPTAINER_CACHEDIR=/nesi/project/nesi99991/ernz2023/$USER/apptainer_cache
[username@mahuika01]$ export APPTAINER_TMPDIR=/nesi/project/nesi99991/ernz2023/$USER/apptainer_tmp
[username@mahuika01]$ mkdir -p $APPTAINER_CACHEDIR $APPTAINER_TMPDIR
[username@mahuika01]$ setfacl -b $APPTAINER_TMPDIR
[username@mahuika01]$ ls -l /nesi/project/nesi99991/ernz2023/$USER
total 1
drwxrws---+ 2 user001 nesi99991 4096 Feb 10 13:42 apptainer_cache
drwxrws---  2 user001 nesi99991 4096 Feb 10 13:42 apptainer_tmp
Testing that Apptainer will run on the NeSI Mahuika cluster
Loading the module
Before you can use the apptainer command on the system, you must load the latest module.
[username@mahuika01]$ module purge
[username@mahuika01]$ module load Apptainer
Showing the version
[username@mahuika01]$ apptainer --version
apptainer version 1.1.5-dirty
Depending on the version of Apptainer installed on your system, you may see a different version. At the time of writing, version 1.1.5-dirty is the latest release of Apptainer.
Using the image cache and temporary directories
Let’s pull an Ubuntu Linux image from DockerHub:
[username@mahuika01]$ cd /nesi/project/nesi99991/ernz2023/$USER
[username@mahuika01]$ apptainer pull docker://ubuntu
INFO:    Converting OCI blobs to SIF format
INFO:    Starting build...
Getting image source signatures
Copying blob 677076032cca done
Copying config 58db3edaf2 done
Writing manifest to image destination
Storing signatures
2023/02/10 14:05:20  info unpack layer: sha256:677076032cca0a2362d25cf3660072e738d1b96fe860409a33ce901d695d7ee8
INFO:    Creating SIF file...
So what we did here was to use the docker:// URL to tell apptainer to go to DockerHub and pull the Ubuntu Docker image. Apptainer pulls the image and converts it into the image file format used by Apptainer and Singularity: .sif. The image file is save in our current directory as ubuntu_latest.sif and a cached copy is in our $APPTAINER_CACHEDIR
If you delete the .sif image that you have pulled from a remote image repository such as DockerHub, and then pull it again, provided the image is unchanged from the version you previously pulled, you will be given a copy of the image file from your local cache rather than the image being downloaded again from the remote source. This removes unnecessary network transfers and is particularly useful for large images which may take some time to transfer over the network. To demonstrate this, remove the ubuntu_latest.sif file stored in your directory and then issue the pull command again:
[username@mahuika01]$ rm ubuntu_latest.sif
[username@mahuika01]$ apptainer pull docker://ubuntu
INFO: Using cached SIF image
As we can see in the above output, the image has been returned from the cache and we don’t see the output that we saw previously showing the image being downloaded and converted from Docker Hub.
Cleaning the Apptainer image cache
We can remove images from the cache using the apptainer cache clean command. Running the command without any options will display a warning and ask you to confirm that you want to remove everything from your cache. This is very useful if you are running low on space or do not want to keep old images on disk.
You can also remove specific images or all images of a particular type. Look at the output of
apptainer cache clean --helpfor more information.
Setup Apptainer for your project
When you want to setup an Apptainer environment for your own project, you can replace the /nesi/project/nesi99991/ernz2023/ path with your project nobackup path. Once done you can also add the environment variables to your personal configuration files, eg.
echo "export APPTAINER_CACHEDIR=/nesi/nobackup/PROJECTID/apptainer_cache" >> $HOME/.bashrc
echo "export APPTAINER_TMPDIR=/nesi/nobackup/PROJECTID/apptainer_tmp" >> $HOME/.bashrc
mkdir -p APPTAINER_TMPDIR=/nesi/nobackup/PROJECTID/apptainer_tmp
mkdir -p APPTAINER_CACHEDIR=/nesi/nobackup/PROJECTID/apptainer_cache
setfacl -b APPTAINER_TMPDIR=/nesi/nobackup/PROJECTID/apptainer_tmp
You will replace PROJECTID with the project number you are provided from NeSI. Project IDs are prefixed with an Institution, such as scion, landcare or uoo followed by a unique 5 digit number. For example nesi99991 is one of NeSI’s training projects.
The above commands append (>>) the quoted string to your .bashrcfile, which is your personal shell configuration file. The .bashrc file is read each time you login, ensuring your Apptainer environment variables are set.
Key Points
Apptainer caches downloaded images so that an unchanged image isn’t downloaded again when it is requested using the
apptainer pullcommand.You can free up space in the cache by removing all locally cached images or by specifying individual images to remove.
Cache location and configuration requirements on Mahuika cluster
Using containers to run commands
Overview
Teaching: 15 min
Exercises: 5 minQuestions
How do I use container software on the cluster?
How do I run different commands within a container?
How do I access an interactive shell within a container?
Objectives
Learn how to run different commands when starting a container.
Learn how to open an interactive shell within a container environment.
Pulling a new image and running a container
Lets continue by pulling a new image from another public image repository and start to work with the container.
[username@mahuika01]$ cd /nesi/project/nesi99991/ernz2023/$USER
[username@mahuika01]$ apptainer pull docker://ghcr.io/apptainer/lolcow
INFO:    Converting OCI blobs to SIF format
INFO:    Starting build...
Getting image source signatures
Copying blob 5ca731fc36c2 done
Copying blob 16ec32c2132b done
Copying config fd0daa4d89 done
Writing manifest to image destination
Storing signatures
2023/02/09 12:20:21  info unpack layer: sha256:16ec32c2132b43494832a05f2b02f7a822479f8250c173d0ab27b3de78b2f058
2023/02/09 12:20:24  info unpack layer: sha256:5ca731fc36c28789c5ddc3216563e8bfca2ab3ea10347e07554ebba1c953242e
INFO:    Creating SIF file...
We pulled a Docker image from a Docker image repo using the apptainer pull command and directed it to store the image file using the default name lolcow_latest.sif in the current directory. If you run the ls command, you should see that the lolcow_latest.sif file is now present in the current directory. This is our image and we can now run a container based on this image:
[username@mahuika01]$ apptainer run lolcow_latest.sif
 _________________________
< Wed Feb 8 23:36:16 2023 >
 -------------------------
        \   ^__^
         \  (oo)\_______
            (__)\       )\/\
                ||----w |
                ||     ||
Most images are also directly executable
[username@mahuika01]$ ./lolcow_latest.sif
 _________________________
< Wed Feb 8 23:36:36 2023 >
 -------------------------
        \   ^__^
         \  (oo)\_______
            (__)\       )\/\
                ||----w |
                ||     ||
How did the container determine what to do when we ran it?! What did running the container actually do to result in the displayed output?
When you run a container from a sif image without using any additional command line arguments, the container runs the default run script that is embedded within the image. This is a shell script that can be used to run commands, tools or applications stored within the image on container startup. We can inspect the image’s run script using the apptainer inspect command:
[username@mahuika01]$ apptainer inspect -r lolcow_latest.sif | head
#!/bin/sh
OCI_ENTRYPOINT='"/bin/sh" "-c" "date | cowsay | lolcat"'
OCI_CMD=''

# When SINGULARITY_NO_EVAL set, use OCI compatible behavior that does
# not evaluate resolved CMD / ENTRYPOINT / ARGS through the shell, and
# does not modify expected quoting behavior of args.
if [ -n "$SINGULARITY_NO_EVAL" ]; then
    # ENTRYPOINT only - run entrypoint plus args
    if [ -z "$OCI_CMD" ] && [ -n "$OCI_ENTRYPOINT" ]; then
This shows us the first 10 lines of the script within the lolcow_latest.sif image configured to run by default when we use the apptainer run command.
Running specific commands within a container
We saw earlier that we can use the apptainer inspect command to see the run script that a container is configured to run by default. What if we want to run a different command within a container?
If we know the path of an executable that we want to run within a container, we can use the apptainer exec command. For example, using the lolcow_latest.sif container that we’ve already pulled from Singularity Hub, we can run the following within the test directory where the lolcow_latest.sif file is located:
[username@mahuika01]$ apptainer exec lolcow_latest.sif echo Hello World!
Hello World!
Here we see that a container has been started from the lolcow_latest.sif image and the echo command has been run within the container, passing the input Hello World!. The command has echoed the provided input to the console and the container has terminated.
Note that the use of apptainer exec has overriden any run script set within the image metadata and the command that we specified as an argument to apptainer exec has been run instead.
Basic exercise: Running a different command within the “lolcow” container
Can you run a container based on the
lolcow_latest.sifimage that prints the current date and time?Solution
[username@mahuika01]$ apptainer exec lolcow_latest.sif dateMon Dec 12 03:43:31 2022
The difference between apptainer run and apptainer exec
Above we used the apptainer exec command. In earlier episodes of this
course we used apptainer run. To clarify, the difference between these
two commands is:
-
apptainer run: This will run the default command set for containers based on the specfied image. This default command is set within the image metadata when the image is built (we’ll see more about this in later episodes). You do not specify a command to run when usingapptainer run, you simply specify the image file name. As we saw earlier, you can use theapptainer inspectcommand to see what command is run by default when starting a new container based on an image. -
apptainer exec: This will start a container based on the specified image and run the command provided on the command line followingapptainer exec <image file name>. This will override any default command specified within the image metadata that would otherwise be run if you usedapptainer run.
Opening an interactive shell within a container
If you want to open an interactive shell within a container, Singularity provides the apptainer shell command. Again, using the lolcow_latest.sif image, and within our test directory, we can run a shell within a container from the hello-world image:
[username@mahuika01]$ apptainer shell lolcow_latest.sif
Apptainer> whoami
<your username>
Apptainer> pwd
/home/<username>
As shown above, we have opened a shell in a new container started from the lolcow_latest.sif image. Note that the shell prompt has changed to show we are now within the container.
Discussion: Running a shell inside a container
Q: What do you notice about the output of the above commands entered within the container shell?
Q: Does this differ from what you might see within a Docker container?
Use the exit command to exit from the container shell.
Key Points
The apptainer exec is an alternative to apptainer run that allows you to start a container running a specific command.
The apptainer shell command can be used to start a container and run an interactive shell within it.
Files in containers
Overview
Teaching: 15 min
Exercises: 15 minQuestions
How do I make data available in a container?
What data is made available by default in a container?
Objectives
Understand that some data from the host system is usually made available by default within a container
Learn more about how handles users and binds directories from the host filesystem.
The way in which user accounts and access permissions are handled in Apptainer containers is very different from that in Docker (where you effectively always have superuser/root access). When running a Apptainer container, you only have the same permissions to access files as the user you are running as on the host system.
In this episode we’ll look at working with files in the context of Apptainer containers and how this links with Apptainer’s approach to users and permissions within containers.
Users within a Apptainer container
The first thing to note is that when you ran whoami within the container shell you started at the end of the previous episode, you should have seen the username that you were signed in as on the host system when you ran the container.
For example, if my username were jc1000, I’d expect to see the following:
[username@mahuika01]$ apptainer shell lolcow_latest.sif
Apptainer> whoami
jc1000
But hang on! I downloaded a version of the lolcow_latest.sif image from a public container repo. I haven’t customised it in any way. How is it configured with my own user details?!
If you have any familiarity with Linux system administration, you may be aware that in Linux, users and their Unix groups are configured in the /etc/passwd and /etc/group files respectively. In order for the shell within the container to know of my user, the relevant user information needs to be available within these files within the container.
Assuming this feature is enabled within the installation of Apptainer on your system, when the container is started, Apptainer appends the relevant user and group lines from the host system to the /etc/passwd and /etc/group files within the container [1].
This means that the host system can effectively ensure that you cannot access/modify/delete any data you should not be able to on the host system and you cannot run anything that you would not have permission to run on the host system since you are restricted to the same user permissions within the container as you are on the host system.
Files and directories within a Apptainer container
Apptainer also binds some directories from the host system where you are running the apptainer command into the container that you’re starting. Note that this bind process is not copying files into the running container, it is making an existing directory on the host system visible and accessible within the container environment. If you write files to this directory within the running container, when the container shuts down, those changes will persist in the relevant location on the host system.
There is a default configuration of which files and directories are bound into the container but ultimate control of how things are set up on the system where you are running Apptainer is determined by the system administrator. As a result, this section provides an overview but you may find that things are a little different on the system that you’re running on.
One directory that is likely to be accessible within a container that you start is your home directory. You may also find that the directory from which you issued the apptainer command (the current working directory) is also mapped.
The mapping of file content and directories from a host system into a Apptainer container is illustrated in the example below showing a subset of the directories on the host Linux system and in a Apptainer container:
Host system:                                                      Apptainer  container:
-------------                                                     ----------------------
/                                                                 /
├── bin                                                           ├── bin
├── etc                                                           ├── etc
│   ├── ...                                                       │   ├── ...
│   ├── group  ─> user's group added to group file in container ─>│   ├── group
│   └── passwd ──> user info added to passwd file in container ──>│   └── passwd
├── home                                                          ├── usr
│   └── jc1000 ───> user home directory made available ──> ─┐     ├── sbin
├── usr                 in container via bind mount         │     ├── home
├── sbin                                                    └────────>└── jc1000
└── ...                                                           └── ...
Now lets have a look at the permissions inside the containers root directory with the command
Apptainer> ls -l /
total 8
lrwxrwxrwx   1 root    root       7 Jul 23  2021 bin -> usr/bin
drwxr-xr-x   2 root    root       3 Apr 15  2020 boot
drwxr-xr-x  23 root    root    9020 Dec  9 10:32 dev
lrwxrwxrwx   1 root    root      36 Feb 16 23:26 environment -> .singularity.d/env/90-environment.sh
drwxr-xr-x   1 cwal219 cwal219   60 Feb 16 23:35 etc
drwxr-xr-x   1 cwal219 cwal219   60 Feb 16 23:35 home
lrwxrwxrwx   1 root    root       7 Jul 23  2021 lib -> usr/lib
lrwxrwxrwx   1 root    root       9 Jul 23  2021 lib32 -> usr/lib32
lrwxrwxrwx   1 root    root       9 Jul 23  2021 lib64 -> usr/lib64
lrwxrwxrwx   1 root    root      10 Jul 23  2021 libx32 -> usr/libx32
drwxr-xr-x   2 root    root       3 Jul 23  2021 media
drwxr-xr-x   2 root    root       3 Jul 23  2021 mnt
drwxr-xr-x   2 root    root       3 Jul 23  2021 opt
dr-xr-xr-x 954 root    root       0 Nov 20 19:48 proc
drwx------   2 root    root      46 Jul 23  2021 root
drwxr-xr-x   5 root    root      67 Jul 23  2021 run
lrwxrwxrwx   1 root    root       8 Jul 23  2021 sbin -> usr/sbin
lrwxrwxrwx   1 root    root      24 Feb 16 23:26 singularity -> .singularity.d/runscript
drwxr-xr-x   2 root    root       3 Jul 23  2021 srv
dr-xr-xr-x  13 root    root       0 Nov 20 19:49 sys
drwxrwxrwt  28 root    root    4096 Feb 16 23:35 tmp
drwxr-xr-x  13 root    root     178 Jul 23  2021 usr
drwxr-xr-x  11 root    root     160 Jul 23  2021 var
This tells us quite a lot about how the container is operating.
Files in Apptainer containers
Try to create a file in the root directory,
touch /bin/somefile. Is that what you expected would happen?In in your home directory, run the same command
touch ~/somefile. Why does it work here? What happens to to the file when you exit the container?Some of the files in the root directory are owned by you. Why might this be?
Why are we using
touchto create files. What happens when you try to runnano?Solution
We will have received the error
touch: cannot touch '/bin/somefile': Read-only file system. This tells us something else about the filesystem. It’s not just that we don’t have permission to delete the file, the filesystem itself is read-only so even therootuser wouldn’t be able to edit/delete this file.Within your home directory, you should be able to successfully create a file. Since you’re seeing your home directory on the host system which has been bound into the container, when you exit and the container shuts down, the file that you created within the container should still be present when you look at your home directory on the host system.
Elaborate on other default binds?
/etc/groupsetc?If you try to run the command
nanoyou will get the errorbash: nano: command not found. This is because nano is not installed in the container, thetouchcommand however is a core util so will almost always be available.
Binding additional host system directories to the container
You will sometimes need to bind additional host system directories into a container you are using over and above those bound by default. For example:
- There may be a shared dataset in a shard location that you need access to in the container
- You may require executables and software libraries in the container
The -B or --bind option to the apptainer command is used to specify additonal binds. Lets try binding the /nesi/project/nesi99991/ernz2023//shared directory.
[username@mahuika01]$ apptainer shell -B /nesi/project/nesi99991/ernz2023//shared lolcow_latest.sif
Apptainer> ls /nesi/project/nesi99991/ernz2023//shared
some stuff in here
Note that, by default, a bind is mounted at the same path in the container as on the host system. You can also specify where a host directory is mounted in the container by separating the host path from the container path by a colon (:) in the option:
[username@mahuika01]$ apptainer  shell -B /nesi/project/nesi99991/ernz2023//shared:/nesi99991 lolcow_latest.sif
Apptainer> ls /nesi99991
some stuff in here
If you need to mount multiple directories, you can either repeat the -B flag multiple times, or use a comma-separated list of paths, i.e.
[username@mahuika01]$ apptainer -B dir1,dir2,dir3 ...
Directories to be bind mounted can be also specified using the environment variable APPTAINER_BINDPATH:
[username@mahuika01]$ export APPTAINER_BINDPATH="dir1,dir2,dir3"
Mounting
$HOMEDepending on the site configuration of Apptainer, user home directories might or might not be mounted into containers by default.
We do recommend that you avoid mounting home whenever possible, to avoid sharing potentially sensitive data, such as SSH keys, with the container, especially if exposing it to the public through a web service.If you need to share data inside the container home, you might just mount that specific file/directory, e.g.
-B $HOME/.localOr, if you want a full fledged home, you might define an alternative host directory to act as your container home, as in
-B /path/to/fake/home:$HOMEFinally, you should also avoid running a container from your host home, otherwise this will be bind mounted as it is the current working directory.
How about sharing environment variables with the host?
By default, shell variables are inherited in the container from the host:
[username@mahuika01]$ export HELLO=world
[username@mahuika01]$ apptainer exec lolcow_latest.sif bash -c 'echo $HELLO'
world
There might be situations where you want to isolate the shell environment of the container; to this end you can use the flag -C, or --containall:
(Note that this will also isolate system directories such as /tmp, /dev and /run)
[username@mahuika01]$ export HELLO=world
[username@mahuika01]$ apptainer exec -C lolcow_latest.sif bash -c 'echo $HELLO'
If you need to pass only specific variables to the container, that might or might
not be defined in the host, you can define variables that start with APPTAINERENV_;
this prefix will be automatically trimmed in the container:
[username@mahuika01]$ export APPTAINERENV_CIAO=mondo
[username@mahuika01]$ apptainer exec -C lolcow_latest.sif bash -c 'echo $CIAO'
mondo
Consistency in your containers
If your container is not behaving as expected, a good place to start is adding the
--containallflag, as an unexpected environment variable or bind mount may be the cause.
Key Points
Your current directory and home directory are usually available by default in a container.
You have the same username and permissions in a container as on the host system.
You can specify additional host system directories to be available in the container.
Lunch
Overview
Teaching: min
Exercises: minQuestions
Objectives
Key Points
Creating Container Images
Overview
Teaching: 10 min
Exercises: 20 minQuestions
How can I make my own Apptainer container images?
How do I document the ‘recipe’ for a Apptainer container image
Objectives
Explain the purpose of a
Apptainer Definition Fileand show some simple examples.Understand the different Singularity container file formats.
Understand how to build and share your own Apptainer containers.
Compare the steps of creating a container image interactively versus a
Definition file.
There are lots of reasons why you might want to create your own Apptainer container image.
- You can’t find an existing container image with all the tools you need.
- You want to have a container image to “archive” all the specific software versions you ran for a project.
- You want to share your workflow with someone else.
Sandbox installation
The most intuitive way to build a container is to do so interactively, this allows you to install packages, configure applications and test commands, then when finished export as an image.
This is possible using the --sandbox flag, for example
sudo apptainer build --sandbox ubuntu docker://ubuntu
This creates an image called ubuntu bootstrapped from docker://ubuntu
You can then run
sudo apptainer shell --writable ubuntu
To start setting up your workflow.
However, there are two big problems with this approach, firstly building a sandbox image requires you to have root access on your machine and therefore unavailable to many people, secondly it doesn’t provide the best support for our ultimate goal of reproducibility.
This is because, even though you can share the image, the steps taken to create it are unclear.
-sandbox should only be used for initial prototyping of your image, the rest of the time you should use a definition file.
Creating a Apptainer Definition File
The Apptainer Definition File is a text file that contains a series of statements that are used to create a container image. In line with the configuration as code approach mentioned above, the definition file can be stored in your code repository alongside your application code and used to create a reproducible image. This means that for a given commit in your repository, the version of the definition file present at that commit can be used to reproduce a container with a known state. It was pointed out earlier in the course, when covering Docker, that this property also applies for Dockerfiles.
Now lets start writing a very simple definition file, make a new file called my_container.def. (Either with your command line text editor of choice, or with the Jupyter text editor).
The first two lines we are going to add define where to bootstrap our image from, we cannot just put some application binaries into a blank image, we need the standard system libraries and potentially a wide range of other libraries and tools.
The most straightforward way to achieve this is to start from an existing base image containing an operating system. In this case, we’re going to start from a minimal Ubuntu 20.04 Linux Docker image. Note that we’re using a Docker image as the basis for creating a Apptainer image.
Bootstrap: docker
From: ubuntu:20.04
The Bootstrap: docker line is similar to prefixing an image path with docker:// e.g. apptainer pull command.
A range of different bootstrap options are supported. From: ubuntu:20.04 says that we want to use the ubuntu image with the tag 20.04 from Docker Hub.
A definition also file has a number of optional sections, specified using the % prefix, that are used to define or undertake different configuration during different stages of the image build process. You can find full details in Apptainer’s Definition Files documentation.
In our very simple example here, we only use the %post and %runscript sections.
The commands that appear in this section are standard shell commands and they are run within the context of our new container image. So, in the case of this example, these commands are being run within the context of a minimal Ubuntu 20.04 image that initially has only a very small set of core packages installed.
Let’s step through this definition file and look at the lines in more detail.
First we have the %post section of the definition file:
%post
    apt-get -y update && apt-get install -y python3
The %post section is where most of the customisation of your container will happen. This includes tasks such as package installation, pulling data files from remote locations and undertaking local configuration within the image.
Here we use Ubuntu’s package manager to update our package indexes and then install the python3 package along with any required dependencies. The -y switches are used to accept, by default, interactive prompts that might appear asking you to confirm package updates or installation. This is required because our definition file should be able to run in an unattended, non-interactive environment.
Finally we have the %runscript section:
%runscript
    python3 -c 'print("Hello World! Hello from our custom Apptainer image!")'
This section is used to define a script that should be run when a container is started based on this image using the apptainer run command. In this simple example we use python3 to print out some text to the console.
Your full definition file should look like this:
Bootstrap: docker
From: ubuntu:20.04

%post
    apt-get -y update && apt-get install -y python3

%runscript
    python3 -c 'print("Hello World! Hello from our custom Apptainer image!")'
More advanced definition files
Here we’ve looked at a very simple example of how to create an image. At this stage, you might want to have a go at creating your own definition file for some code of your own or an application that you work with regularly. There are several definition file sections that were not used in the above example, these are:
%setup%files%environment%startscript%test%labels%help
The Sections part of the definition file documentation details all the sections and provides an example definition file that makes use of all the sections.
Useful base images
At the time of writing, Docker Hub is the most popular web registry for general purpose container images. Therefore all images mentioned below are hosted in this registry.
CUDA
nvidia/cuda has images to build GPU enabled applications. There are different image types for different needs. Tags containing runtime are suitable for binary applications that are ready to run; if you need to compile GPU code, pick tags containing devel instead. Different OS flavours are available, too.
MPI
As you can see in the episode on MPI applications, when containerising this type of software the MPI libraries in the image need to be ABI compatible with the MPI libraries in the host. The Pawsey Supercomputing Centre maintains some MPICH base images at pawsey/mpi-base, for building images that will run on our HPC systems.
Python
python hosts the official Python images. Different versions are available for some OS flavours. At the time of writing the default image tag corresponds to Python 3.8 on Debian 10. Smaller base images have tags ending with -slim.
continuumio/miniconda3 are images provided by the maintainers of the Anaconda project. They ship with Python 3, as well as pip and conda to install and manage packages. At the time of writing, the most recent version is 4.7.12, based on Python 3.7.4.
If you need interactive Jupyter Notebooks, Jupyter Docker Stacks maintain a series of dedicated container images. Among others, there is the base SciPy image jupyter/scipy-notebook, the data science image jupyter/datascience-notebook, and the machine learning image jupyter/tensorflow-notebook.
R
The Rocker Project maintains a number of good R base images. Of particular relevance is rocker/tidyverse, which embeds the basic R distribution, an RStudio web-server installation and the tidyverse collection of packages for data science. At the time of writing, the most recent version is 3.6.1.
Other more basic images are rocker/r-ver (R only) and rocker/rstudio (R + RStudio).
Key Points
Definition filess specify what is within Apptainer container images.The
singularity buildcommand is used to build a container image from aDefinition file.Apptainer definition files are used to define the build process and configuration for an image.
Existing images from remote registries such as Docker Hub and other public image repositories can be used as a base for creating new Apptainer images.
Building Container Images
Overview
Teaching: 10 min
Exercises: 25 minQuestions
How do I create my own Apptainer images?
Objectives
Understand the different Apptainer container file formats.
Understand how to build and share your own Apptainer containers.
So far you’ve been able to work with Apptainer from your own user account as a non-privileged user.
This part of the Apptainer material requires that you use Apptainer in an environment where you have administrative (root) access.
There are a couple of different ways to work around this restriction.
| pros | cons | ||
|---|---|---|---|
| Install Apptainer locally on a system where you do have administrative access (then then copy to HPC). |
|
|
|
| Build your container from within another container |
|
|
|
| Use a 'remote build service' to build your container |
|
|
|
Simulate root access using the --fakeroot feature |
|
|
We’ll focus on the last option in this part of the course - Simulate root access using the --fakeroot feature.
Building container via Slurm
The new Mahuika Extension nodes can be used to build Apptainer containers using the fakeroot feature. This functionality is only available on these nodes at the moment due to their operating system version.
Since the Mahuika Extension nodes are not directly accessable, you will have to create a slurm script.
Create a new file called build.sh and enter the following.
#!/bin/bash -e
#SBATCH --job-name=apptainer_build
#SBATCH --partition=milan
#SBATCH --time=0-00:15:00
#SBATCH --mem=4GB
#SBATCH --cpus-per-task=2

module purge
module load Apptainer

apptainer build --fakeroot my_container.sif my_container.def
Submit your new script with,
The module purge command will remove unnecessary modules we may have loaded that would interfere with our build.
[username@mahuika01]$ sbatch build.sh
Submitted batch job 33031078
You can check the status of your job using sacct
[username@mahuika01]$ sacct -X
JobID           JobName          Alloc     Elapsed     TotalCPU  ReqMem   MaxRSS State
--------------- ---------------- ----- ----------- ------------ ------- -------- ----------
33031074        spawner-jupyter+     2    00:27:29     00:00:00      4G          RUNNING
33031277        apptainer_build      2    00:00:06     00:00:00      4G          RUNNING
Note, the first job shown there is your Jupyter session.
Once the job is finished you should see the built container file my_container.sif.
[username@mahuika01]$ ls
apptainer_cache apptainer_tmp build.sh lolcow_latest.sif my_container.def my_container.sif python-3.9.6.sif slurm-33031491.out ubuntu_latest.sif
Note the slurm output slurm-33031491.out, if you don’t have my_container.sif you will want to check here first.
We can test our new container by running.
module load Apptainer
./my_container.sif
Hello World! Hello from our custom Apptainer image!
We can also inspect our new container, confirm everything looks as it should.
[username@mahuika01]$ apptainer inspect my_container.sif
org.label-schema.build-arch: amd64
org.label-schema.build-date: Friday_17_February_2023_11:52:9_NZDT
org.label-schema.schema-version: 1.0
org.label-schema.usage.apptainer.version: 1.1.5-dirty
org.label-schema.usage.singularity.deffile.bootstrap: docker
org.label-schema.usage.singularity.deffile.from: ubuntu:20.04
org.opencontainers.image.ref.name: ubuntu
org.opencontainers.image.version: 20.04
[username@mahuika01]$ apptainer inspect ir my_container.sif
{: .language-bash}
#!/bin/sh
python3 -c 'print("Hello World! Hello from our custom Apptaine image!")' ```
Known limitations
This method, ( i.e using fakeroot), is known to not work for all types of Apptainer/Singularity containers.
If your container uses RPM to install packages, i.e. is based on CentOS or Rocky Linux, you need to disable the APPTAINER_TMPDIR environment variable (use unset APPTAINER_TMPDIR) and request more memory for your Slurm job. Otherwise, RPM will crash due to an incompatibility with the nobackup filesystem.
Remote build
Apptainer remote builder
Currently there are no freely available remote builders for Apptainer.
Apptainer offers the option to run build remotely, using a Remote Builder we will be using the default provided by Sylabs; You will need a Sylabs account and a token to use this feature.
[username@mahuika01]$ apptainer remote login
Generate an API Key at https://cloud.sylabs.io/auth/tokens, and paste here:
API Key:
Now paste the token you had copied to the clipboard end press Enter:
INFO: API Key Verified!
With this set up, you may use apptainer build -r to start the remote build. Once finished, the image will be downloaded so that it’s ready to use:
[username@mahuika01]$ apptainer build -r lolcow_remote.sif lolcow.def
INFO:    Remote "default" added.
INFO:    Authenticating with remote: default
INFO:    API Key Verified!
INFO:    Remote "default" now in use.
INFO:    Starting build...
[..]
INFO:    Running post scriptlet
[..]
INFO:    Adding help info
INFO:    Adding labels
INFO:    Adding environment to container
INFO:    Adding runscript
INFO:    Creating SIF file...
INFO:    Build complete: /tmp/image-699539270
WARNING: Skipping container verifying
 67.07 MiB / 67.07 MiB  100.00% 14.18 MiB/s 4s
At the time of writing, when using the Remote Builder you won’t be able to use the %files header in the def file, to copy host files into the image.
You are now ready to push your image to the Cloud Library, e.g. via apptainer push:
[username@mahuika01]$ apptainer push -U lolcow.sif library://<YOUR-SYLABS-USERNAME>/default/lolcow:30oct19
WARNING: Skipping container verifying
 67.08 MiB / 67.08 MiB [==================================================================================================================================] 100.00% 6.37 MiB/s 10s
Note the use of the flag -U to allow pushing unsigned containers (see further down).
Also note once again the format for the registry:
Finally, you (or other peers) are now able to pull your image from the Cloud Library:
[username@mahuika01]$ apptainer pull -U library://<YOUR-SYLABS-USERNAME>/default/lolcow:30oct19
INFO:    Downloading library image
 67.07 MiB / 67.07 MiB [===================================================================================================================================] 100.00% 8.10 MiB/s 8s
WARNING: Skipping container verification
INFO:    Download complete: lolcow_30oct19.sif
Key Points
Apptainer definition files are used to define the build process and configuration for an image.
Apptainer’s Docker container provides a way to build images on a platform where Apptainer is not installed but Docker is available.
Existing images from remote registries such as Docker Hub and Singularity Hub can be used as a base for creating new Apptainer images.